Your cart

Your cart is empty


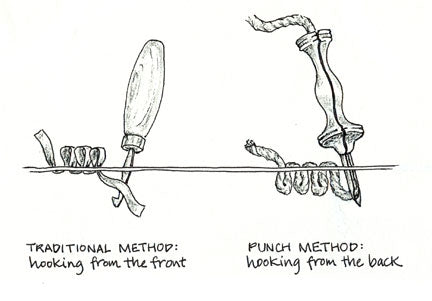
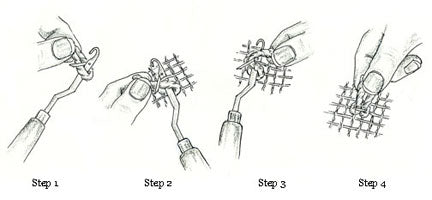
How Does Punch Needle Rug Hooking Work?

The Oxford Punch Needle forms a continuous loop stitch. Every time you push The Oxford Punch Needle down, it pushes down a long end of yarn. When you bring The Oxford Punch Needle back up, it folds this end into a loop. There are no knots used. The tightness of all the loops packed together keeps it from unraveling. You work from the back side of the rug, so as a novice keep turning over your work to check that your loops are all the same length on the front side of your work.

My stitches keep pulling out! What am I doing wrong?

  1. Make sure that you always punch your Oxford Punch Needle ALL THE WAY DOWN as far as it will go into the rug backing.
  2. When you move forward to punch your next loop DON’T LIFT YOUR NEEDLE UP TOO HIGH! If you do, that will pull your loops right out! Instead of lifting your needle up, drag it along the surface of the monk’s cloth.
  3. Remember that your yarn needs to be able to flow freely through the Oxford Punch Needle at all times! Check for the following problems: Do you have a knot in your yarn? Is your yarn getting caught on your frame, under your arm or hand? Is your yarn tangled? Try putting your ball of yarn in a coffee can to keep it from rolling all over the floor.

My loops are all uneven heights, what am I doing wrong?

Make sure that you follow steps 1-3 above. If you do these things and your loops are still uneven try tightening your monk’s cloth on the frame. Tighten it a lot! Loose monk’s cloth can cause uneven loops. Your monk’s cloth should be as tight as a drum! We make every effort to manufacture the best punch needles possible but regret that every once in a while our Oxford Punch Needles do break. It is highly unlikely, but there is a slight chance that your needle has come unglued – that the metal needle has slipped in the wooden handle. If this happens to you we apologize and hope that you will send it back to us for an immediate replacement or for your money back. We are proud of our tools and offer a lifetime guarantee, no matter how many rugs you’ve made, or how many “miles’ you’ve put on your punch needle.

Traditional Method versus Punch Method of Rug Hooking

What is the difference between punch needle rug hooking and traditional rug hooking?

Traditional rug hooking started in around the 1830’s and uses a rug hook, which is a short crochet-like hook in a wooden handle. A rug hooker pulls their loops up with their hook. Punch needle started in the 1880’s and is done with a punch needle. A puncher punches their loops down with their punch. Basically, hookers pull loops up and punchers punch loops down. Because punch needle isn’t done with a hook it isn’t technically “hooking.” Many people call punching “hooking” because it forms the exact same running loop stitch.

Latch Hooking

Is this the same as latch hook?

No. Latch hooking is done on a mesh backing with 1/4” wide square holes. Rug yarn is precut into 2 1/2” lengths. The yarn is knotted into each square of the mesh with a latch hook. This tool has a little hook with a catch at the end that makes it easy to knot your yarn. A shag effect is created because both ends of the yarn stick up forming a pile approximately 1 1/4” tall. This rug method is not technically considered rug hooking. It is however one of the more well-known methods of home rug making. The main differences are that latch is knotted and has a cut pile and punch is a running stitch with uncut loops and no knots.

I’m a beginning puncher and the right side of my rug is a complete mess! I hate it! There are long threads sticking out and I can’t even see my design. I like the wrong side better! Help!

Don’t panic! Take a deep breath! Because we work on the back side of our rugs (the wrong side) we don’t have that much control as to what is happening on the right side. It is common for loops to punch through other loops – splitting them and making them look uneven or pushing them out of place. Also, because we push all of our finished ends to the right side, the right side will be all hairy! After you punch you need to clean up the right side of your rug. Everyone does it – you haven’t made a mistake at all! Here’s how to clean up:

  1. Cut off all of those long ends so they’re level with your loops. We call this “snipping.” When you do this, the cut ends will blend right in. Cut them off one at a time, don’t cut clumps of them together or they will show.
  2. Clean up your lines and outlines. Take control of your rug! We call this “poking.” Do this with your closed scissors or another pointy tool (like an awl or the end of your punch needle). Poke your loops around and don’t be afraid to really maneuver them into place. Push them into place until each loop is where you meant for it to be. This can take some time but is really worth the effort. A well-made rug should be beautiful on both sides. It is a good idea to “snip” and “poke” as you go. My book includes some before and after pictures. The results are dramatic.

Does my punch needle ever need to be sharpened?

No, they just get better and smoother with age. The only time you might run across a problem is if you drop it on a cement floor and get a “burr” on your needle. If this happens, mail it back to us and we will replace the needle for you at no charge. You can also try removing a burr by filing it carefully with a metal nail file.

There are no knots in hooked rugs? Why don’t they pull out?

Hooked rugs have so many loops packed in tightly together that the tension keeps the loops from pulling out. Also, the small holes in the rug backing grip the loops and help to keep them in place. In addition, when you’re punching, loops tend to punch through other loops. This helps to hold the rug together. The only thing that unravels these rugs seems to be puppies that chew them, or cats that knead them with their claws. Beater bars on vacuum cleaners can also be dangerous.

How should I clean my rug?

It’s fine to vacuum your rug as long as you don’t use a beater bar. Sweeping them with a broom is fine too. Punch needle rugs may be dry cleaned by a reputable dry cleaner. Woolite® Foam Rug Cleaner works well for spot cleaning or when you want to clean a rug quickly. Follow the directions on the can for a heavily soiled rug (even if your rug isn’t heavily soiled.) Simply spray the foam all over the top of your rug, rub it in with a damp sponge, let it dry, and then vacuum. Remember to always test an inconspicuous area of the rug first before using this product.

Your rug may also be hand washed in the sink or bathtub in COLD WATER ONLY with Woolite® or Ivory Liquid®. Before you wash it, take it outside and give it a good shake until all the loose dirt comes out. Wash it the same way you would wash a wool sweater. Never washed a wool sweater? It's easy! Just add some Woolite® or Ivory Liquid® to a tub full of cold water and put in your rug to soak. Rub the rug gently, don’t wring or twist it. The water will probably be filthy!

Drain the tub and refill it with clean cold water. Soak your rug in the clean water, rub your rug around, and dunk it in and out to get the soap and dirt out. (This is called rinsing.) You will probably need to drain the tub again, add fresh cold water, and rinse several times until the water is clear. When the rinse water is finally clear, drain the tub and gently squeeze and press the water out of your rug. (Again, don’t wring or twist it). To dry your rug, place it on top of a clean dry towel. Replace the towel as needed with a dry towel. A thick rug can take two or three days to dry.

Another cleaning product that many fiber artists love is called Eucalan®. With this soap, you wash your rug as described above, but no rinsing is required.

I never put my rugs in the washing machine and I never use hot water. One of my students ruined her rug by washing it in hot water - a red yarn in her design bled and ran into her white background. Some companies claim that their yarns won’t run, and several of them are telling the truth. But why risk it? I like to err on the side of caution…

The old fashioned way to clean hooked rugs is to put your rug face down in fresh snow. Gently beat the rug with a broom and keep moving your rug and beating it until the snow comes out clean. You can also rub snowballs on areas to help remove dirt. After doing this, I then put 2-3 inches of snow on top of my rug and sweep it off with a broom. I know this wintery method sounds crazy, but it really works. Obviously this method isn’t always practical or possible.

Can you please explain your crazy punch needle size numbering system?

Crazy isn’t it? Maybe this will help to clear it up: When I first designed my punch needle, I based my numbers on my favorite punch needle, The Craftsman’s Punch Needle , which I had used for many years. This is an adjustable tool with ten different settings so you can use it to punch ten different loop heights ranging from ¼” to ¾.” I chose the settings that I used the most, and decided to make my punch needles in those sizes (see illustration below). In addition to the #8, #9, and #10 settings found on The Craftsman’s Punch Needle, I also make two shorter needles, a #13, and a #14.

Pile Heights


When was the first punch needle invented?

Griffin Rug Machine

As far as we know, the first punch needle was invented in 1881. Called “The Griffin,” it was patented by Ebenezer Ross in Toledo Ohio. Since that time, there have been over 100 different brands of punch needles. Early punch needles were advertised and marketed to be used with both yarn and fabric strips. (Similarly, the first “traditionally” hooked rugs were made with both yarn and strips as well. Early rug hookers used whatever materials they had on hand. What a wonderful luxury we have today to have so many beautiful fibers at our fingertips!)

How do I know what needle size to use?

Please see Oxford Punch Needle page for help with this.

How do I know what punch needle size I have? There is no number on my punch!
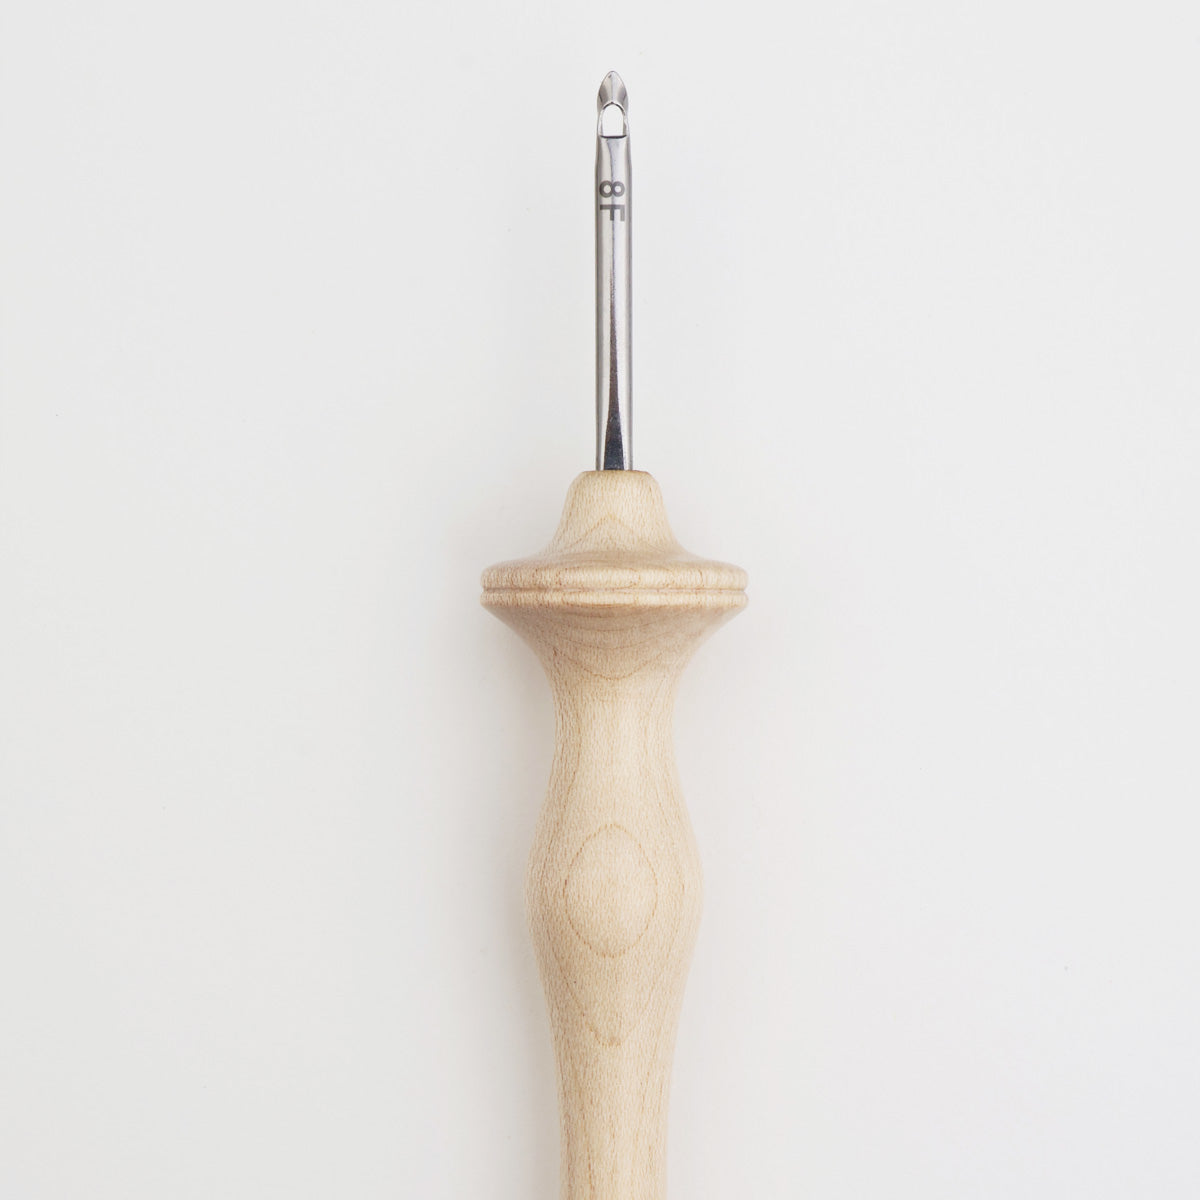
Look at the needle with the metal point facing you and you will see the number. You can go over it with a pen to make it show up better or write your number with a Sharpee® pen somewhere else on the tool if you want to.

Look at the punch needle with the metal point facing you and you will see the number.

Do I have to work on a frame?

I strongly recommend it. If your rug backing is stretched nice and tight it is SO much easier to punch. Your needle will zip right through the backing! I’ve tried punching without a frame and found it very difficult. One exception to this is Oriental style punch needle rug hooking. With this technique, you punch in every hole of a monk’s cloth rug backing and going “frameless” seems to work well. For more information on this technique, visit American Heirloom.

Can I use an embroidery hoop instead of a frame?

You definitely can, but it isn’t the best way to go. I find that an embroidery hoop doesn’t keep my work tight enough. Punching the needle in and out loosens up the backing and I have to keep constantly tightening my work. Morgan makes a nice embroidery hoop that they call the Morgan No-Slip Hoop. It is readily available online, in craft shops and at sewing stores.

What kind of a frame would you recommend?

As mentioned above, for punch needle rug hooking your rug backing needs to be stretched REALLY TIGHT! There are two types of frames that will achieve this goal that are the most popular with rug punchers:
  • Frames with carpet tack strips
  • Frames with gripper strips

.

Tack Frame

Carpet tack frame.

Gripper strip detail.

Do you prefer carpet tack or gripper strip frames?

My personal favorite kind of frame now definitely has gripper strips! Why? It's MUCH easier and faster to get my backing tight on a gripper frame than a carpet tack frame. Also, my hands don't get sore when I'm tightening my backing. My students who have tried both all agree - gripper frames are really fabulous. If you have arthritis, carpal tunnel, or don't have much strength in your hands the gripper frames are a better choice.

My rug is bigger than my gripper strip frame.  Can I move it on the frame?

Moving your rug is not recommended if you’re using fine yarns, fine strips of fabric, or textured fancy, designer, or novelty type yarns. Fine and fancy fibers will snag on the grippers when you try to move your rug. Sturdier fibers such as rug yarn, #6, #7, or #8 cut strips of wool will not snag. (#6 cut strips are 6/32" wide, #7 cut are 7/32" wide, and #8 cut are 1/4" wide.) So… If you use sturdy rug yarn (such as Violet Jane), other heavy-duty yarn, or wider cut fabric strips you can move your rug beautifully with confidence! Move it carefully and your rug will peel right off the grippers unharmed.

If you're NOT going to move your rug on a gripper frame you can go wild and use any fine or fancy fibers you choose!

Are there different kinds of gripper strips?

Yes, here at the Oxford Company we use gripper strips that are designed especially for working on monk's cloth and linen. There are also gripper strips that are meant for burlap. These don't work well for punching.

Are the grippers sharp?

Not at all compared to carpet tack strips. They can be a little prickly so I cover my frame with a Frame Cover. You can also cover the grippers with an old towel or other fabric.

Do you like carpet tack frames?

Yes! I used nothing but carpet tack frames for over 25 years and got along fine! I still use them regularly. If I have rugs with delicate fibers that I need to move, I always use a carpet tack frame (for how to do this see below). Carpet tack frames are more affordable so that's a plus. The tacks are very sharp and you can scratch yourself but this isn't a problem if you're careful. You cover them up with protective padding while you work so they are not a problem when you are punching.

How do you cover the carpet tack with padding?

After I stretch my backing onto the frame, I cover the carpet tacks with rolled up fabric, old towels, foam core, or other padding. Another padding I like to use is the heavy felt padding that’s normally used as rug under-padding by carpet installers. This is also available from stores that sell wall-to-wall carpeting. I cut this into 1 ½” strips. I can often get this stuff for free as installers often have scraps left over from their projects that are too small for them to use.

What size frame would you recommend?

If you're just getting started I suggest doing a small project first to make sure you like punching. A chair pad or wall hanging is a good place to start. Our 16" x 16" Oxford Carpet Tack Lap Frame is a good choice and so is our 18” x 18” Oxford Gripper Strip Lap Frame. I put the bottom of the lap frame in my lap and rest the top of it against a table when I work. People often tell us, "But I don't have a table where I want to work. I want to hook in front of TV in my living room." Not a problem! You can rest your lap frame over the top of a chair or on a small folding table.

I have played around with different size lap frames. The biggest size I like to use is 21” x 30” (interior dimensions). I find that anything larger than this is too awkward to hold in my lap. We have these available with carpet tack and gripper strips on our Supplies page. Children and petite adults might want to choose a smaller frame than this.

For rugs, I use larger frames on legs or stands. I made one myself that I really like called a "card table frame." This is a simple idea – all I did was take a large rectangular frame and screw card table legs to the bottom of it! You can buy an old card table at a yard sale and remove the legs. Card table legs can also be found online. My card table frame is 30" X 40" (interior dimensions). I like this frame because I can make a good sized rug without moving it at all. Remember: when making yourself a frame, don't make it so wide that you can't reach the middle! 30" is my limit - I can't reach more than 15" comfortably across the frame.

Can I make myself an affordable frame?

You bet! This hobby doesn't have to be expensive! Carpet tack is your most affordable option. I like to make frames out of wooden canvas stretcher bars (available from art supply stores and craft shops). I attach carpet tack strips to the frame (tack strips are available from stores that sell wall-to-wall carpeting). These strips are narrow bars with angled tacks sticking out of them. I stretch my monk’s cloth over these tacks. (They are SHARP so use caution!) My book, Punch Needle Rug Hooking, has directions for making your own simple lap frame with carpet tack strips.

I’m working on a frame with carpet tack strips. Can I move my rug on the frame?

Yes! But beware! When you move your rug, don’t put the part that you’ve already punched on top of the nasty carpet tack! It will pull out your loops! Eek! Here’s a step-by–step guide for moving your rug:

  • Step 1: Plan ahead so you move your piece as few times as possible. This usually means starting on one end of the rug, or in a corner – not in the middle!
  • Step 2: Hook the first section of your rug.
  • Step 3: When done, take this off the frame.
  • Step 4: Figure out what area you want to punch next.
  • Step 5: Lay your rug gently on top of the frame in this area.
  • Step 6: Anywhere that you have carpet tack touching punched loops is not good! Cover the carpet tack in these areas with felt, foam core, or rolled up fabric. (This means that some of your carpet tack will be covered, but some will not.)
  • Step 7: Stretch your rug gently on the frame. Don’t make it tight yet.
  • Step 8: You can’t stretch where your carpet tack is covered with padding. Argh! Now what?
  • Step 9: In these areas use 1 ½” common nails to nail your rug to the wooden frame. Obviously, don’t just hammer with reckless abandon! CAREFULLY place the tip of the nail between the loops, push down gently, and then hammer!

Caution: When moving your rug, make sure that you line it up so it stays the right shape! In other words, be careful that your circle doesn’t become an oval, and that your rectangular rug doesn’t wind up having a bend in the middle! Just eyeball your rug each time you move it to make sure it keeps its shape. Also, stagger your ends where you have to move the rug so it isn’t obvious where you stopped and restarted.

How to move your rug is hard to describe in words. For a complete step-by-step description complete with photographs, please see my book, Punch Needle Rug Hooking.


Degraff Frame

DeGraff Frame

Jerry DeGraff, from Hinesburg, Vermont, makes a very nice standing frame that I like a lot and featured in Punch Needle Rug Hooking. There isn’t a very good picture of this frame in my book because it is always covered with a rug, but you can see it in use on pages 50 and 62. It’s sturdy, well made and handsome and has served me well for many years. Just for fun, I painted mine green to match my studio. The frame is available with or without carpet tack, and is also available with gripper strips (shown here). For more information about the frame, contact Jerry at daveyinvt@gmail.com or call (802) 482-2720.

Card Table Frame

Card Table Frame

A small inexpensive handmade lap frame made with canvas stretcher bars and carpet tack. The felt padding is for covering the nails to protect your hands. Interior dimensions: 16” x 16” This close-up shows the carpet tack strip nailed to the inside edge of the frame.

What weight yarns should I use?

In my regular point Oxford Punch Needles:

I use 3-ply 100% wool rug yarn. This is a similar weight to bulky knitting yarn and is approximately 1/8” thick. I like rug yarn because it’s more durable than knitting yarn. It’s made from a coarser and stronger fleece than knitting yarn and is spun tighter as well. I always use wool in my rugs for high-traffic areas. After all my hard work, I want my rug to last. Wool wears so well! Really, there’s nothing like wool… For low-traffic areas and wall hangings I use all kinds of things. Cotton, jersey, linen, mohair, alpaca, angora, blends and synthetics, are all terrific. If I like the looks of it, I’ll try it! For example, cotton chenille makes gorgeous bath mats. Don’t be afraid to experiment. There are some really cool “novelty yarns” out now and many of them are really affordable as well. I will often double, triple, and quadruple finer yarns and use them together in the punch. Basically, you can use any yarns that are up to 1/8” thick. Stay away from yarns that have thick lumps in them because these lumps won’t go through the punch. Similarly, designer yarns that are very shaggy and hairy won’t work. Some slippery yarns, such as silk, will fall right out of the punch. If a slippery yarn doesn’t work on its own, try combining it with something else. Experiment! Have fun! Try different yarns and combinations to see what you like!

In my fine point Oxford Punch Needles:

I use worsted weight yarn, sock weight, baby weight, tapestry yarn, and needlepoint yarn. Again, avoid yarn with lumps, hairy yarns, and yarns that are very slippery. Embroidery floss doesn’t work!

I want to punch using fabric strips. What size punch needle should I use? How wide should my strips be?

To get the look of traditional primitive hooked rugs, use a #10 Regular Oxford Punch Needle and 1/4" wide strips of wool fabric.

In rug hooking, 1/4" wide strips are called #8 cut. Why, you might ask? Good question! Strip cutting machines come with different size cutter heads. The sizes are based on thirty-seconds of an inch, so a #1 cut is 1/32" wide, a #2 cut is 2/32" wide, a #3 cut is 3/32" wide, etc. Thus a #8 cut strip is 8/32" wide. If you remember your fractions from school 8/32" is the same as 1/4".

For the traditional look, some rug hookers prefer using #6 cut strips instead of #8 cut. The #6 cut strips are a bit narrower and glide more easily through the punch needle.

Yes! You can punch with fabric strips!
Yes! You can punch with fabric strips! Top: #14 Fine Oxford Punch Needle (“The Mini ) threaded with a #3 cut strip. Bottom: #10 Regular Oxford Punch Needle threaded with a #8 cut (1/4”) strip.

When I’m punching with strips my loops are all twisted. How do I fix this?

When using strips in the punch the loops can come out like "crooked teeth!” When pulling loops with a traditional rug hook a precise rug hooker can keep loops from twisting and make them line up perfectly like ribbon candy. With the punch, loops can come out less perfectly aligned. I have customers who love the look of punched loops and others who don't because they only want the "ribbon candy" look. I am able to keep my loops from twisting by following these tips:

  • Always learn to punch with yarn first. It’s much easier to work with and will help you get the hang of punching before you move on to fabric strips.
  • Make sure your stitches aren't too close together. If you are using monk's cloth and a #6 cut strip punch in every 2nd hole. When putting your rows side by side, space your next row 2 holes over. When using #8 cut strips punch in every 2nd hole but put your next row three holes over.
  • After you've threaded your strip into the punch but before you start punching - pull your strip back and forth several times to make sure that your strip lays flat in the channel of the punch needle and isn't twisted to begin with.
  • Longer strips will tend to make twisted loops. Shorter ones don't have the opportunity to get so twisted up.
  • Keep an eye on your strip at the point where it is about to enter into the punch. You will notice that it can start to twist there. You can untwist it every once and a while and this will help.
  • Punching more slowly will help keep your loops from twisting.
  • Turning to make right angles will make your loop twist. You can end before you turn to avoid this.
  • Finally, straighten any twisted loops that are bothering you after you punch! Some people do this with tweezers.

Can I use strips in “The Mini?”

Yes, #3 cut strips work really well. Anything thicker than a #3 cut strip won’t feed through the needle. I suggest using lightweight wool such a flannel. Coat weight wool is often too thick.

Can I use strips of fabric and yarn in the same piece?

Yes! It works wonderfully!

I’m a traditional rug hooker. Can I make part of my rug with a rug hook, and the rest of it with a punch needle?

Yes. Just remember that you use a rug hook on the front side of the rug and the punch needle on the back. You might want to have your design on both sides of your backing. Some people like to do the punch needle part first, and then do the actual hooking to match the loop height of the punch. Others prefer to do the hooking first and to then choose a punch needle size that matches their hooking.

Star Flower Rug, by Celia Oliver

Star Flower Rug. Made by Celia Oliver, Shelburne, Vermont. Design adapted from an antique rug at Shelburne Museum. This rug combines traditional rug hooking and punch needle rug hooking First Celia worked the stars, flowers, leaves, and stems with a hook, then she filled in the background using a punch. Celia used a #10 Oxford Punch Needle.

What size monk’s cloth should I use?

I use monk’s cloth that has 12-14 holes per inch. Caution: they make a monk’s cloth with 6-7 holes per inch. Avoid this! Your loops will fall out - leading to the tearing out of hair and gnashing of teeth.

Do I have to use monk’s cloth? Can I use linen or burlap?

With the regular point Oxford Punch Needle you can use monk’s cloth and rug linen. Rug linen has the same thread count as monk’s cloth (12-14 holes per inch), but it’s stiff, and not as easy to use as monk’s cloth. It also tends to be more slippery, and you have to be much more careful while punching. However, this is just my opinion. Some people prefer linen to monk’s cloth. Unbleached rug linen is great for "looks" if you aren’t punching the entire piece, and want to leave some backing showing.

The fine point Oxford Punch Needle works well with monk’s cloth, rug warp, and rug linen. When I’m working on monk’s cloth, I like to wash it and dry it first to shrink the holes. I find that this helps the loops to stay in. It isn’t essential, but if you try it, you’ll notice the difference. I have tested several other different linens and have liked working with 20 and 27 count Belgian linens. You can also punch directly onto wool fabric. I use a lightweight wool, such as flannel (the same kind they make wool flannel shirts out of…) This is nice to do because you only have to punch the motif, and the wool backing itself can become your “background.”

Avoid burlap like the plague. The sharp punch needle will break the burlap threads. I’ve seen it happen, and it’s not pretty! Also, burlap is made from jute, and will get brittle with age and fall apart.

How much yarn will I need?

For rugs, using a #8, #9, or #10 Regular Oxford Punch Needle: It takes approximately 2/3 of a pound of yarn per square foot.

Illustration of Hand MethodTo figure out yarn amounts you can also use “the hand method.” To do this, simply place your hand on your rug and draw a generous imaginary circle around your hand (this is based on a large man’s hand so make the circle approximately 9” in diameter.) This circle is the equivalent of one 4 oz. skein of 3-ply rug yarn. You can measure your whole rug in this manner and estimate smaller areas by estimating whether they are a quarter of a hand, a half a hand, etc. The hand method is designed to give you a bit more than you will need so you won’t run out. With practice you will become comfortable with this method. It may sound unscientific, but it really works.

For the #14 Fine Oxford Punch Needle (the “Mini”): It takes 1.3 yards to cover a square inch.

I did a little test when I invented the “Mini.” I took one ounce of Violet Jane worsted weight rug yarn and measured it. It was 40 yards long. I hooked a square, starting in the middle and spiraled my way outwards until I ran out of yarn. This one ounce of yarn made a 5 1/2" square.

Here’s the formula for using worsted weight yarn in the mini:
It took one ounce of worsted weight yard to make this 5 1/2 inch square It took one ounce of worsted weight yarn to make this 5 1/2 inch square using "The Mini" 1 oz. worsted weight yarn = 40 yards This makes a 5.5 inch square 5.5inch X 5.5inch = 30.25 square inches 40 yards ÷ 30.25 square inches = 1.3 yards per square inch

Are you using different types of yarn or different punch needle sizes? Weigh one ounce of yarn and make yourself a test square like I did. Use the same formula shown above and you will know exactly how much yarn you will need. You might want to add 10% extra yarn, just so you don’t run out!

It took one ounce of worsted weight yarn to make this 5 1/2 inch square using "The Mini"
It took one ounce of worsted weight yarn to make this 5  1/2 inch square using "The Mini"

How long does it take to make a hooked rug?

A fast puncher, using bulky weight rug yarn, can punch a square foot in approximately three hours. This doesn’t count all the time it takes to figure out what colors to put where! I tend to spend a lot of time taking things out and re-punching until I’m happy. Obviously, the more detailed and complicated the rug, the longer it will take. I haven’t had a chance to time myself using the new “Mini” needle yet! Everything I’ve made has been kind of complicated and I think I’ve spent more time pulling things out than putting them in! I did punch the 5 1/2" square to see how far one ounce of worsted weight rug yarn would go. It took me about 40 minutes to punch, but I was chatting with a friend, watching TV, and eating snacks at the same time…

Is there anything special I need to know if I design my own rug?

Remember that your design has to be backwards because you are working on the back of your rug! Be especially careful about this if you are doing lettering.

How do these rugs hold up?

If you use wool, a good rug backing, and good technique – your rugs will last for generations.

Can I jump over other stitches when I’m punching?

You can, but I wouldn’t! It will weaken your rug. I got a rug to repair once and whoever made it had jumped hundreds of times. Most of these stitches pulled out and I had to re-punch all of them. For a wall hanging it would probably be OK to jump, but don’t jump far!

I’d like to hang my rug on the wall instead of putting it on the floor. How do I do this?

Here are some of your options:

  • At the Shelburne Rug Show we hang rugs by attaching carpet tack strips to the walls and we hang the rugs directly on the strips. (Carpet tack strips are available at flooring stores.) Putting up rugs and taking them down again is quick and easy to do with this method. This is also how we hang the rugs at The Oxford Rug Hooking School. If the sides of the rug flop forward we carefully use a few small brads to nail the bottom corners of the rug to the wall. Wait to use brads on the bottom though! Often the rug will flatten out after it's been hanging for a while.
  • If you don't want multiple nail holes in your wall from the carpet tack strips you can create a lightweight wooden frame for the rug. Then attach the rug to the wooden frame with small brads and the frame can hang from the wall on a single nail or picture hanger.
  • Sew a sleeve across the top of the rug and insert a dowel to hang the rug.
  • Sew 2" wide velcro to the top of the rug. Sew a backing to the rug first if necessary. The stiff side of the velcro gets attached to the wall and the soft side is sewn to the rug. Sometimes more velcro is needed on the sides to make the rug lie flat. This is often done with more fragile antique rugs.
  • Attach the rug to the wall with a few small brads only.

My cat (or puppy) has been pulling out the loops of my hooked rug! Is there anything I can put on the back of my rug to keep it from unraveling?

If the pulled out yarn is still in tact you can fix the damage with a crochet hook by pulling the loops back up through the rug backing. Some people put latex on the back of hooked rugs to protect them but personally, I don't. I repair a lot of rugs and many of the older ones that have been treated with latex are a disaster! The latex actually crumbles with time and eats away at the yarn. Some brands of latex contain formaldehyde that is harmful to the environment, to us, and our pets. If you have a rug that is a valuable antique, applying latex will greatly diminish the rug’s value. Dogs and cats can pull out loops in rugs even when there is latex on the back. Instead of latex, I choose to put under-padding underneath my rugs. This is available at Home Depot, carpet stores, and many stores that carry household items. Pet stores often sell sprays to discourage pets from this kind of activity. Test first on a small area on the back of the rug to make sure it doesn’t discolor your work.


Back to top of page